Night photography is one of the most captivating forms of photography. While many photographers prefer shooting during the day when light is abundant, the night offers a completely different world filled with dramatic contrasts, vibrant city lights, reflections, and creative opportunities. What appears dark and ordinary to the human eye can become extraordinary through the lens of a camera.
The beauty of Night Photography lies in its ability to reveal scenes that are often overlooked during daylight hours. From illuminated skylines and bustling urban streets to peaceful waterfronts and star-filled skies, nighttime environments offer endless possibilities for creating stunning images that evoke emotion and tell compelling stories.
Whether you are a beginner exploring photography for the first time or an enthusiast looking to improve your skills, understanding the art of photographing after dark can significantly expand your creative potential. In this guide, we will explore essential techniques, equipment recommendations, composition strategies, and some of the best night photography locations in Vancouver.
Why Night Photography Is So Powerful
Photography is fundamentally about capturing light. Ironically, some of the most striking photographs are created when light is limited.
Night photography introduces elements that are difficult to find during the day:
- Dramatic contrasts between light and shadow
- Vibrant artificial lighting
- Colorful reflections on water and glass
- Long exposure effects
- Atmospheric moods and emotions
- Reduced visual distractions
At night, ordinary scenes often become visually stunning. A familiar street corner can transform into an artistic composition filled with glowing lights, reflections, and dynamic movement.
Unlike daytime photography, where sunlight can dominate a scene, nighttime photography gives photographers more control over how light is captured and interpreted.
Understanding Light in Night Photography
One of the biggest challenges in night photography is learning how light behaves in low-light environments.
During the day, sunlight provides a relatively consistent source of illumination. At night, photographers must work with a variety of light sources, including:
- Streetlights
- Building lights
- Vehicle headlights
- Neon signs
- Moonlight
- Decorative lighting
Each light source has its own color temperature and intensity, creating unique visual effects.
For example, warm streetlights can create a cozy atmosphere, while cool LED lights often produce a modern urban feel. Learning to recognize and utilize these light sources is a key part of creating stunning images.
The Importance of Shadows
Many beginner photographers focus only on light. However, shadows are equally important.
Shadows add:
- Depth
- Texture
- Drama
- Visual interest
In night photography, shadows often become an essential compositional element rather than a problem to avoid.
Essential Equipment for Night Photography
While expensive gear is not always necessary, certain equipment can make nighttime shooting significantly easier.
Camera
A camera with good low-light performance is highly beneficial. Modern mirrorless and DSLR cameras perform exceptionally well at higher ISO settings.
Tripod
A tripod is arguably the most important tool for night photography.
Long exposure photography requires the camera to remain perfectly still for several seconds or even minutes. Without a tripod, images often become blurry.
Wide-Angle Lens
Wide-angle lenses are ideal for:
- Cityscapes
- Architecture
- Landscapes
- Urban environments
They allow photographers to capture more of the scene while emphasizing perspective.
Remote Shutter Release
A remote shutter helps eliminate camera shake during long exposures. If you do not have one, using the camera’s timer function can achieve similar results.
Night Photography Camera Settings Explained
Many beginners struggle because they use daytime settings after dark. Understanding the exposure triangle is crucial.
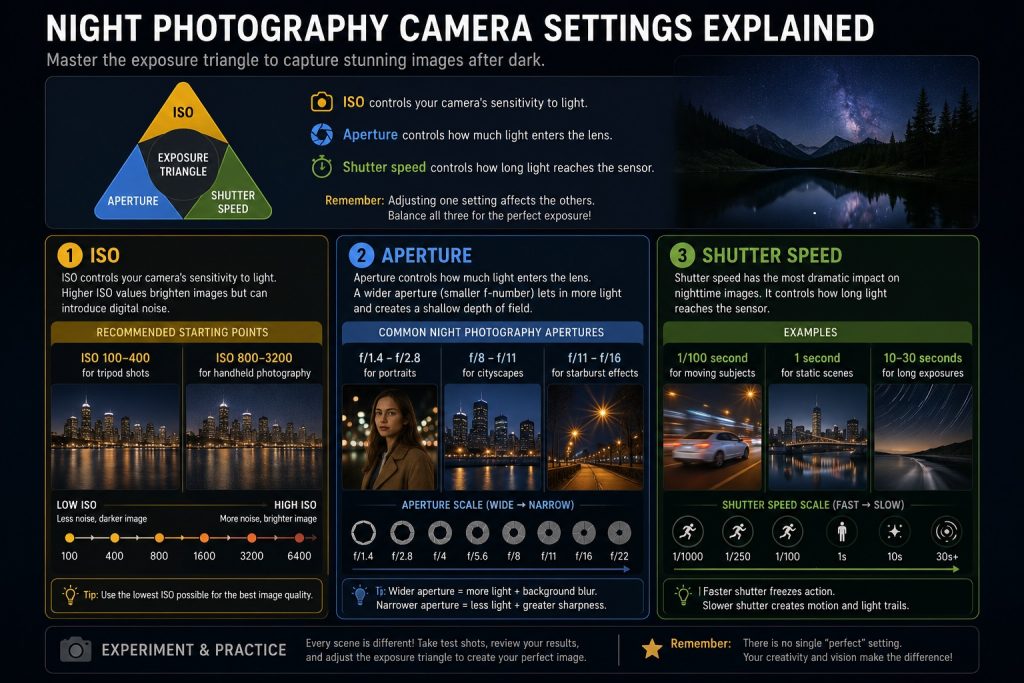
Night Photography Techniques for Creating Stunning Images
The difference between an ordinary photograph and a memorable image often comes down to technique.
Long Exposure Photography
Long exposure is one of the most popular night photography techniques. By keeping the shutter open for several seconds, photographers can capture movement in creative ways.
Examples include:
- Light trails from vehicles
- Smooth water surfaces
- Moving clouds
- Dynamic urban scenes
A busy street can become a beautiful composition of flowing light simply by extending the exposure time.
Night Photography Techniques: Settings, Exposure, and Essential Gear
Light Painting
Light painting involves using a flashlight or other light source during a long exposure. This technique allows photographers to selectively illuminate subjects and create artistic effects.
Reflection Photography
Reflections can dramatically enhance nighttime images.
Look for:
- Wet streets
- Lakes
- Rivers
- Glass buildings
Reflections often double the visual impact of city lights.
Silhouette Photography
Strong backlighting can create powerful silhouettes. By exposing for the background light source, subjects become dark shapes that add mystery and storytelling potential.
How to Compose Better Night Photos
Technical settings are important, but composition ultimately determines whether an image is visually engaging.
Use Leading Lines
Roads, bridges, railings, and pathways naturally guide the viewer’s eye through a photograph. Leading lines are particularly effective at night when illuminated by artificial lights.
Include Foreground Elements
Foreground objects help create depth.
Examples include:
- Trees
- Benches
- People
- Street signs
Without foreground interest, night images can sometimes feel flat.
Simplify the Scene
Nighttime photography often works best when distractions are minimized. Focus on a single subject or a clear visual story rather than trying to include too many elements.
Look for Contrast
Contrast creates visual impact.
Examples include:
- Bright lights against dark skies
- Warm and cool colors
- Sharp structures and soft reflections
Common Night Photography Mistakes and How to Avoid Them
Even experienced photographers occasionally make mistakes.
- Using ISO That Is Too High: Excessive ISO can introduce unwanted noise. Instead of increasing ISO dramatically, use a tripod and longer shutter speed whenever possible.
- Ignoring White Balance: Different light sources produce different colors. Adjusting white balance can dramatically improve image quality and realism.
- Focusing Incorrectly: Autofocus often struggles in low light. Switching to manual focus can provide better accuracy.
- Forgetting About Stability: Even slight camera movement can ruin a long exposure image. Always ensure your tripod is stable.
- Overediting: Night images should look natural. Excessive editing often creates unrealistic colors and unnatural lighting.
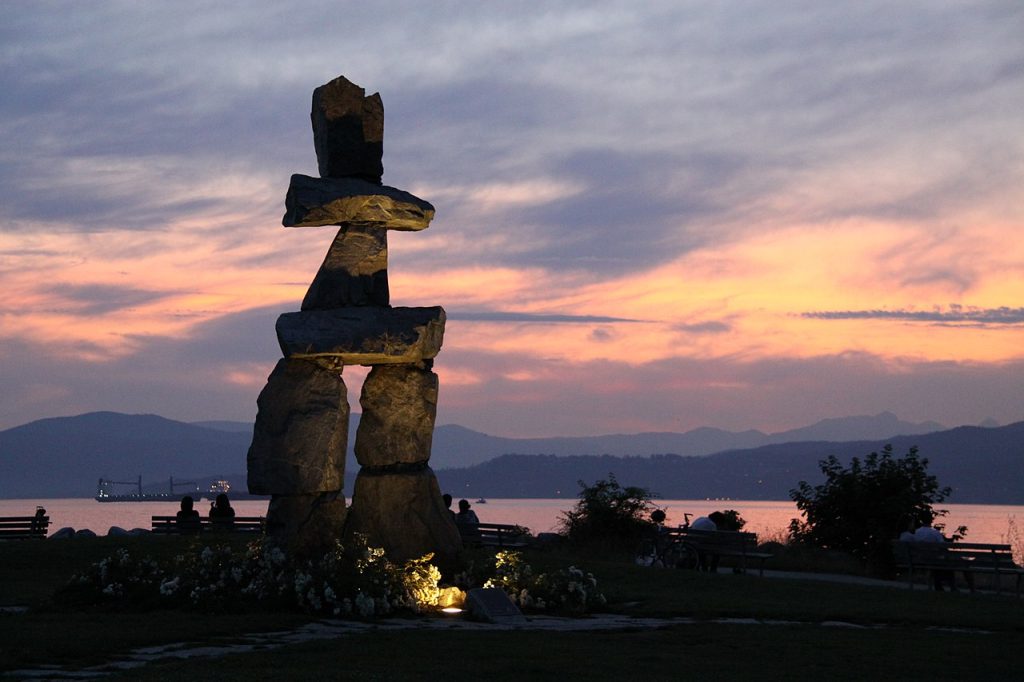
Best Night Photography Locations in Vancouver
Vancouver offers incredible opportunities for night photography. Its combination of urban architecture, waterfront views, mountains, and modern skylines makes it one of Canada’s most photogenic cities after dark.
Canada Place

One of Vancouver’s most recognizable landmarks.
Highlights include:
- City skyline views
- Illuminated sails
- Harbor reflections
Coal Harbour
Coal Harbour offers stunning reflections of downtown buildings on calm water. The contrast between urban lights and natural surroundings creates exceptional photographic opportunities.
Granville Street
Perfect for capturing:
- Neon signs
- Street activity
- Urban energy
The vibrant atmosphere provides endless opportunities for creative photography.
English Bay
Sunset transitions beautifully into nighttime photography at English Bay.
Photographers can capture:
- Reflections
- City lights
- Waterfront scenes
Lonsdale Quay
Located in North Vancouver, this location provides spectacular views of downtown Vancouver across Burrard Inlet. The skyline reflections are particularly impressive after sunset.
Wedding Photographer North Vancouver
Lions Gate Bridge
The illuminated bridge creates dramatic compositions, especially when photographed from nearby viewpoints.
Can You Take Great Night Photos with a Smartphone?
Absolutely. Modern smartphones include advanced night modes that significantly improve low-light performance.
To achieve better results:
- Keep the phone stable.
- Use night mode when available.
- Avoid digital zoom.
- Clean the lens before shooting.
- Utilize available light creatively.
While professional cameras offer greater control, smartphones can still produce impressive nighttime images.
Editing Night Photography for Maximum Impact
Post-processing plays an important role in creating stunning images. However, editing should enhance reality rather than completely transform it.
Key adjustments include:
- Exposure: Carefully brighten shadows without losing highlight detail.
- Noise Reduction: Reduce digital noise while preserving important textures.
- Contrast: Increasing contrast can help emphasize dramatic lighting.
- Color Correction: Adjust color temperature to achieve a natural appearance.
- Sharpening: Apply sharpening carefully to enhance details without introducing artifacts. The goal is to create a polished image that still feels authentic.
Why Practice Is Essential in Night Photography
Night photography requires patience. Unlike daytime photography, results are not always immediate.
Successful photographers often:
- Visit locations multiple times
- Experiment with different settings
- Analyze mistakes
- Continuously refine their techniques
Every nighttime environment presents unique challenges and opportunities. The more you practice, the more intuitive your decision-making becomes.
Night Photography in Practice: Real Examples from the Field
Understanding camera settings and composition techniques is important, but nothing compares to experiencing Night Photography in real-world conditions. Every location presents unique lighting challenges and creative opportunities. The following examples demonstrate how darkness, reflections, silhouettes, and natural light can work together to create stunning images.(By mandana rostami)
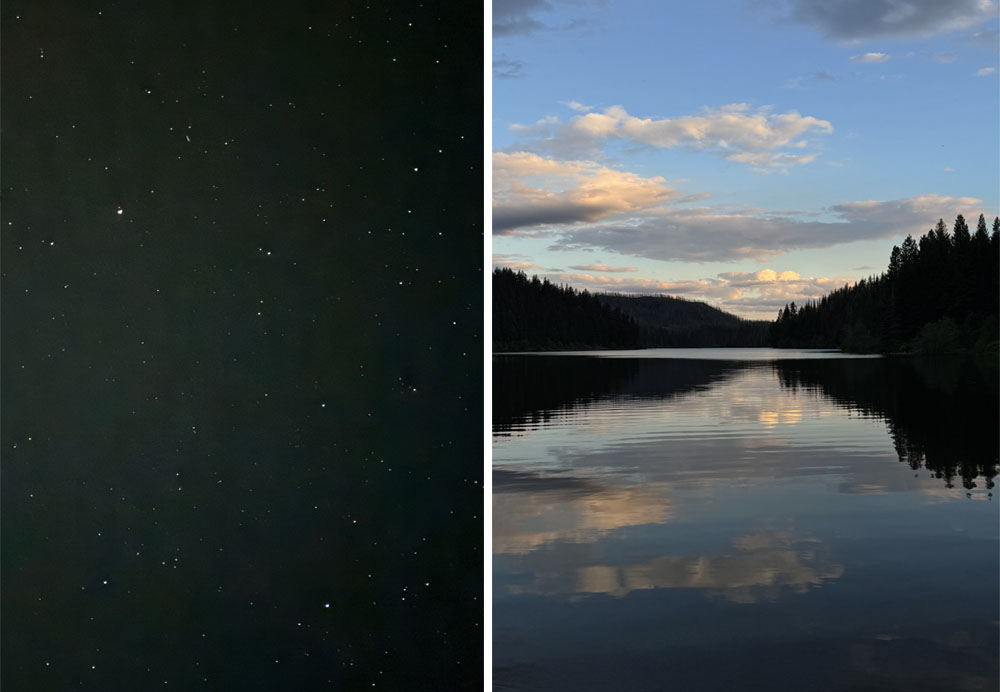
Example 1: Moonlight Reflections on a Quiet Lake
As the moon rises behind the treeline, its reflection transforms the calm lake into a mirror of light and shadow. The scene demonstrates one of the most powerful concepts in Night Photography: using natural light creatively rather than trying to eliminate darkness.
The contrast between the dark forest and the illuminated clouds creates visual drama, while the reflection on the water adds balance and symmetry. Moments like this remind photographers that darkness is not an obstacle—it is part of the composition.
Photography Insight:
When photographing moonlit landscapes, look for reflections on still water. These reflections can double the visual impact of your image and create a stronger sense of atmosphere.
Example 2: The Calm Before Nightfall
In the final moments before darkness fully arrives, the landscape enters what photographers often call the “Blue Hour.” During this brief period, soft light remains in the sky while artificial lighting has not yet become dominant.
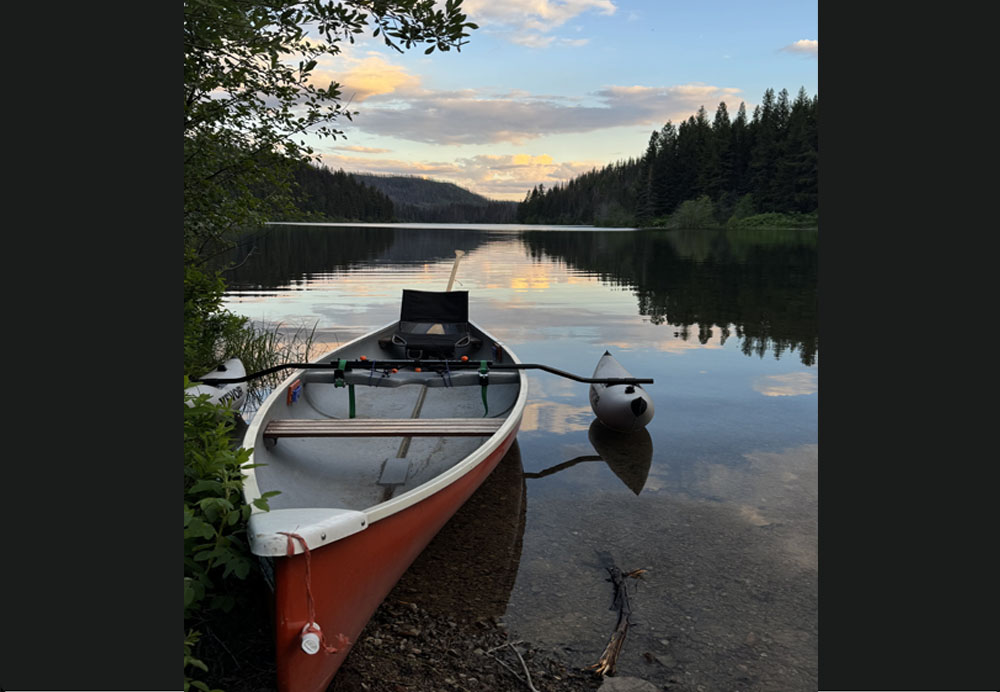
In this image, the canoe resting quietly along the shoreline serves as a strong foreground subject, guiding the viewer into the scene. The reflections of clouds and subtle evening colors help create a peaceful mood that would be difficult to achieve during the middle of the day.
This type of scene illustrates why many photographers consider Blue Hour to be one of the best times for creating stunning images.
Photography Insight:
Including a recognizable foreground element such as a canoe, dock, or person can add scale, depth, and storytelling to your night photographs.
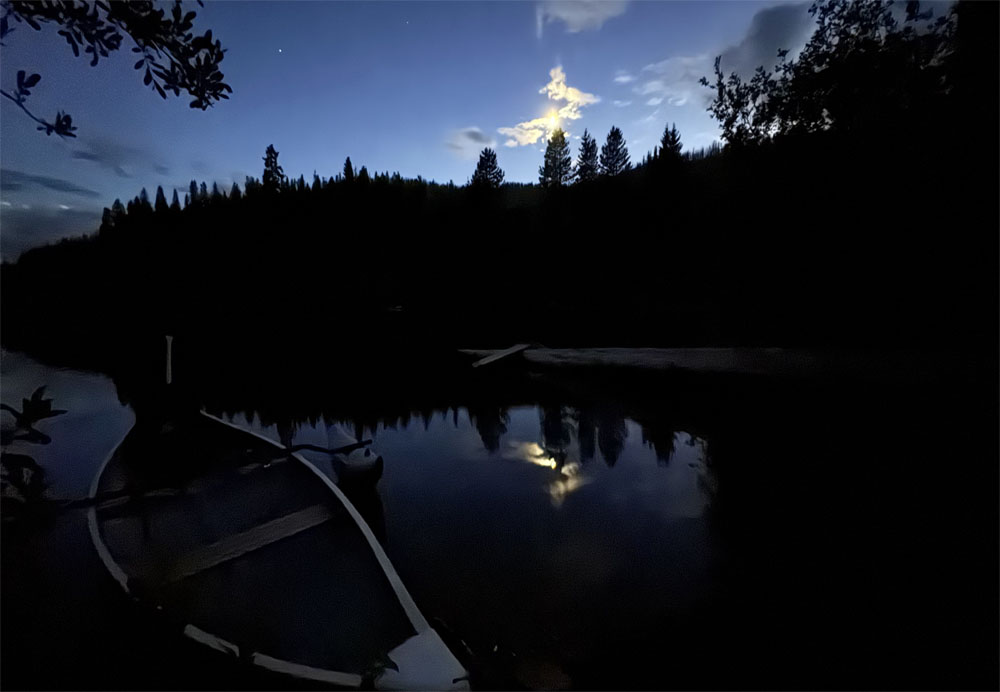
Example 3: A Silent Conversation Between Earth and Sky
Some of the most memorable night photographs rely on simplicity. In this image, a single towering tree reaches toward the evening sky while the moon emerges through drifting clouds.
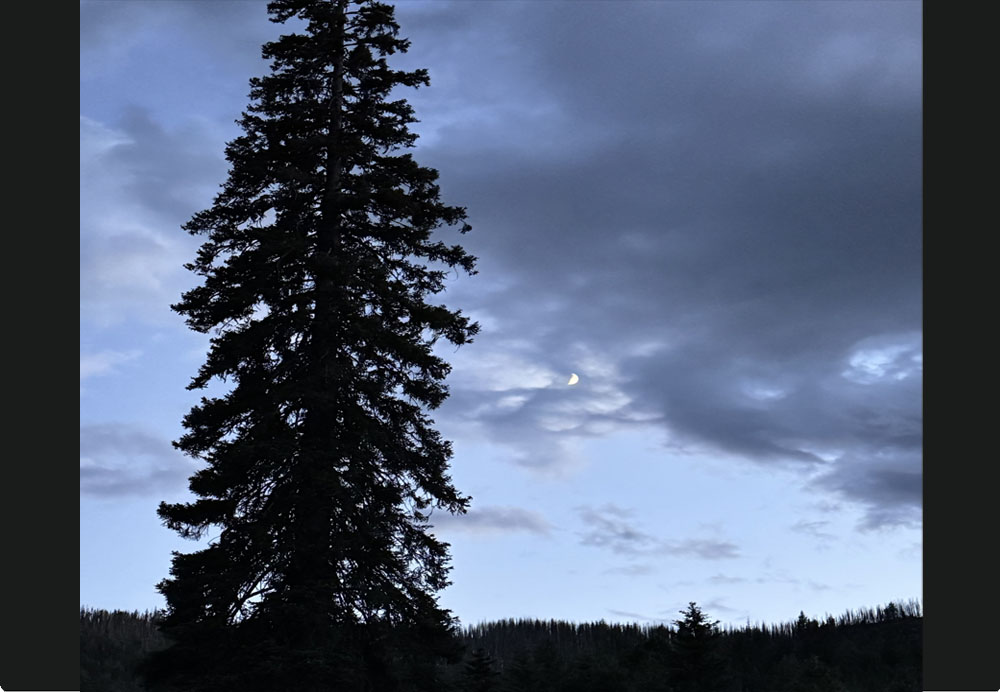
The silhouette of the tree creates a strong visual anchor, while the moon provides a natural focal point. The limited light enhances the mood and encourages viewers to focus on shape, texture, and atmosphere rather than color.
This scene demonstrates how Night Photography can evoke emotion through minimalism. Instead of relying on bright lights or complex compositions, the image tells a story through contrast and mystery.
Photography Insight:
Silhouettes are one of the most effective tools in low-light photography. Position your subject against a brighter sky or moonlit background to create dramatic visual impact.
What These Images Teach Us About Night Photography
These examples highlight several important lessons:
- Darkness can enhance a photograph rather than diminish it.
- Reflections create depth and visual interest.
- Blue Hour often provides ideal lighting conditions.
- Foreground subjects strengthen composition.
- Silhouettes add emotion and storytelling.
- Simplicity often creates stronger images than crowded scenes.
Most importantly, they demonstrate that successful Night Photography is not simply about technical settings. It is about observation, patience, and learning to see beauty in light that many people overlook.
Conclusion
Night Photography is far more than simply taking pictures after sunset. It is an art form that transforms darkness into opportunity, allowing photographers to capture atmosphere, emotion, and visual drama in ways that daylight often cannot.
By understanding light, mastering camera settings, improving composition, and experimenting with creative techniques such as long exposures and reflections, photographers can consistently create stunning images that stand out.
Whether you are photographing vibrant city streets, architectural landmarks, waterfront reflections, or peaceful night landscapes, every evening offers a new opportunity to tell a unique visual story. With patience, practice, and creativity, the darkness can become one of your greatest artistic tools.
Frequently Asked Questions
What is the best camera setting for night photography?
A good starting point is ISO 100–400, aperture f/8, and a shutter speed between 5 and 20 seconds when using a tripod.
Do I need a tripod for night photography?
Yes. A tripod is one of the most important tools because it allows you to use long exposures without introducing blur.
What is the best time for night photography?
The blue hour, which occurs shortly after sunset, often provides ideal lighting conditions for night photography.
Can beginners learn night photography?
Absolutely. With basic knowledge of exposure, composition, and lighting, beginners can quickly improve their nighttime photography skills.
What are the best night photography locations in Vancouver?
Popular locations include Canada Place, Coal Harbour, English Bay, Granville Street, Lonsdale Quay, and Lions Gate Bridge.